

How to Use NTRIP with Apeks GNSS Receivers
How to Use NTRIP with Apeks GNSS Receivers
NTRIP (Real-Time Transmission over Network) is a protocol that transmits GNSS correction data in real time over the internet, significantly improving positioning accuracy. When used in conjunction with Apeks GNSS receivers, NTRIP can help you achieve high-precision real-time positioning and is widely used in fields such as geographic surveying, land surveying, and construction. This article will detail how to configure and use NTRIP network mode to ensure you can successfully achieve accurate GNSS measurements.
To successfully use Network Mode, make sure you meet the following:
1.Stable internet signal at your job site (4G SIM or hotspot)
2.Active access to a CORS base station (IP address, port, username, password)
Step 1: Connect Your Apeks GNSS Receiver
Before you can use NTRIP, ensure that your Apeks GNSS receiver is properly set up. Connect the receiver to a power source and ensure that it is ready to receive signals from GNSS satellites.
To use NTRIP, your Apeks GNSS receiver must have an internet connection. If your device does not have built-in internet connectivity, you can use a mobile hotspot or a Wi-Fi network to establish a connection.


Step 2: Set Up NTRIP on Your Apeks GNSS Receiver
Once your GNSS receiver is powered on and connected to the internet, you can begin configuring NTRIP.
- Access the Configuration Menu: On your Apeks GNSS receiver, go to the configuration settings. This is typically done through the connected software interface.
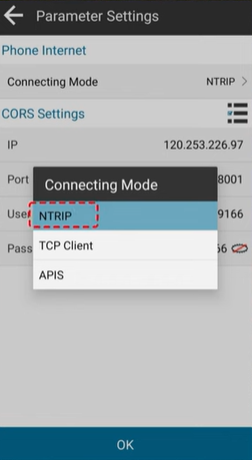
- Enable NTRIP: Find the NTRIP settings section in the configuration menu. Make sure NTRIP is enabled.
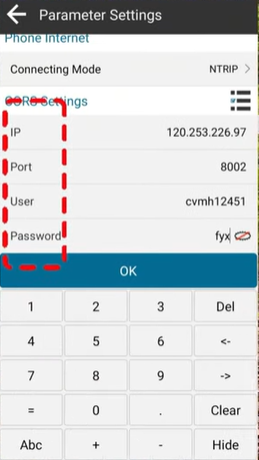
- Enter NTRIP Caster Information:To access the NTRIP correction service, you need to input the correct NTRIP caster information.
- IP:The address of the NTRIP caster you are connecting
- Port Number:The specific port number for the NTRIP caster
- Username and Password::ome NTRIP services require authentication, so you may need to provide a username and password (which should be provided by your NTRIP service provider).
4.Mount Point: This is the specific data stream you will be connecting to. Your service provider will give you this information.
5.Save the Configuration: After entering all the necessary details, save the configuration settings.

Step 3: Connect to the NTRIP Caster
Once your NTRIP settings are configured, your Apeks GNSS receiver will attempt to connect to the NTRIP caster.
- Check Connection Status: On the display or through the software, verify that the receiver has successfully connected to the NTRIP caster. It should show a status of "Connected" or "Streaming.
- Verify Correction Data: After establishing the connection, your receiver will begin to receive real-time corrections. Check that the GNSS receiver’s position accuracy is improving (usually indicated by a lower position error or more satellites in view).
Summary
Using NTRIP with your Apeks GNSS receiver is a straightforward process that can greatly enhance the accuracy of your positioning data in real-time. Whether you are conducting land surveys, mapping construction sites, or performing geodetic measurements, real-time GNSS corrections via NTRIP will help ensure that you get the most precise results.
For more tutorials and professional tips on RTK operation, stay tuned for our upcoming guides.